Pages

Friday, August 12, 2011

Barn Board Kitchen

Barn Board Kitchen shelving

Open shelving in a rustic contemporary kitchen


I have always wanted open shelving in my kitchen but didn't like the look of store bought shelves. So I decided to get some barn boards (mine come from an old barn more than 100 yrs old). I got them sanded, cut and glued to fit my kitchen. I then stained them in light walnut Danish oil to give it a more rustic and aged look. The boards are oak and after staining the grain of the wood show a bit of golden undertone. I absolutely love the look of a rustic contemporary kitchen and so I decided to go with the dark satin and to contrast the dark stain I chose nickel brackets. I am happy how the kitchen looks for now but still there are few areas that I would be tackling in the next few days. Thanks for stopping by!


Tuesday, May 31, 2011

'Dream' Banner


I just love how banners make any room look instantly lived in and cosy. I decided to make a banner for my little girl's room and she definitely loves it. She picked the word "DREAM". I made this lovely banner from a table cloth. The table cloth had seen better days and now even better as it has turned into something prettier. I love the way it looks over the bed, absolutely amazing, fit to be in my little princess's room.


I think re-using left over fabrics or small cut out fabric pieces for this job is an excellent idea. I love the way this little project turned out and I'm sure to make more banners in the future.

Saturday, April 30, 2011

My new line of French Country Living collection

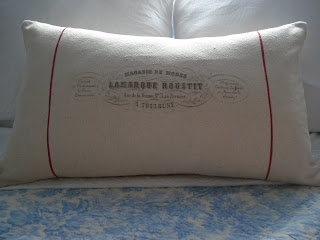
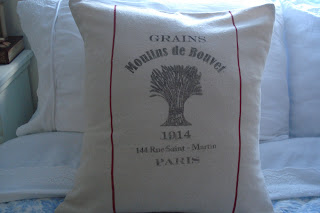
Have been extremely busy with work at the clinic and shop, so didn't get enough time to blog. No more whining and let's get to the point. Few days back, while going through a French country living magazine I saw a gorgeous picture of a French country side home nestled in a rural village. The living room was airy and casual with no hang ups. This inspired me to design something that was meant for casual living and here are the few pillows I designed for my shop. Have a look and enjoy!


These pillow's are made from nubby looking vintage grain sack type fabric. The design is inspired from French country side which boost a natural casual living. The pillow will give any room an instant French country feel without going to a great extent. I absolutely love the fabric color which is lovely creamy French.

Lamarque Roustit Pillow


'Grains' Moulins de Bouvet Pillow


You can buy these on my etsy shop by visiting: http://www.etsy.com/shop/Thefadedtearose

Sunday, March 13, 2011

Red cross Burlap pillow

I always wanted to make these lovely pillows. I have seen them in different magazines but the only difference is that, the Red cross is either embroidered or stitched right on the pillow. I am just not good at embroidery or stitching things onto something. For me, it makes more sense if I can replicate the same look by using fabric paint. Acrylic paint works just fine and does not wash off.


In this project I have used apple barrel Bright Red 20501 and folk art Burnt umber 462.


Both are acrylic paint and I mix them in the ratio 1: 1. I start drawing the cross at the centre by taking measurements on the pillow cover, which I have already stitched.


Once the drawing is perfect where you want it to be then put a piece of thick cardboard or plastic sheet inside the pillow cover so that the colour does not bleed over the other side of the fabric. Use a paint brush with which you are comfortable and start filling the paint at the centre and then slowly with a steady hand do the borders. As I am doing this on burlap which tends to have bits of fibres sticking out you have to be careful as you go. You can also get the borders right by using fine tip painting brush. There is one more variation if you don't have a steady hand, you can make a cross with masking tape. In the next tutorial I will show you how to do this step by step with masking tape. If you have any ideas to make it better you are always welcome to share it with us.


Red cross Burlap pillow


Monday, February 21, 2011

Carrots and Potatoes in a rich Creamy sauce

Happy 2011 everyone! This post was published in January but it got accidentally deleted so here it is again! I know this post has nothing to do with home decor but like everything else I thought it would be good to share it with all of you. Like every year this year too I am planning to eat healthy, sumptuous food. Recently I came up with a healthy way to eat potatoes without having them in a traditional way of mashed potatoes or having to deep fry them like fries and they taste evenly delicious. Here's the recipe:

Ingredients:
1. 5-6 medium size red organic potatoes diced
2. Organic baby carrots
3. 10 -12 Baby spinach leaves
4. 1/2 teaspoon finely chopped flat- leaf parsley
5. 1 cup orange juice
6. 1 tablespoon unsalted Butter
7. 1 teaspoon Brown sugar
8. 1/4 teaspoon Salt
9. Black Pepper
10. Cream cheese

Getting started
Boil potatoes and carrots in boiling water until they are 80 % done. You don't have to peel the skin off if you are using organic red potatoes and baby carrots. Don't cook them completely they have to be underdone as they are going to be sauteed  later. Once they are cooked run them under cold water this also helps to get the extra starch off. In a saucepan add 1tbsp unsalted butter when the butter is just started to melt add brown sugar, don't let it caramelise completely. Add boiled potatoes, carrots and saute for a quick minute. Add 1 cup orange juice get the liquid to reduce by one fourth.  Add baby spinach at the end as it cooks very quickly. Finally add salt, ground black pepper and garnish it with some chopped parsley. You could also put some cream cheese on top if you don't mind the extra calories. It tastes good with rye bread or even as a side dish with any chicken recipe. Use your imagination and have FUN cooking!